 |
by: Tim "Blackjack" Griffiths ...Back...|...The Garage...|...Hondachopper.com's Index... |
|
by: Tim "Blackjack" Griffiths ...Back...|...The Garage...|...Hondachopper.com's Index... |
| "How do I mount a brake on a springer
fork?" seems to be a frequently asked question. So here is an explanation
of the principals involved. Firstly let's look at the problems we are facing.
What happens is that the rocker goes up and down, and bolted between it
is the axle and front wheel with its brake. If we think about a drum brake
for a minute, the backplate is not free to rotate when the axle is tight.
Seeing as it requires a torque arm we also have to bolt that somewhere,
usually the rear leg. If we just use a wheel out of a set of telescopic
forks and add a strap to the rear leg, hey presto!, no more suspension.
The whole assembly is now bolted up solid.
. Well it is fairly easy to make the torque arm pivot by adding a "Rose" or Heim joint at each end of it. Trouble is that doesn't do anything for the brake backplate. what is required is a "floating" brake, that is to say with the axle fully tightened and the torque arm removed, the brake is free to spin. So we need to bore out the centre of the backplate and install a bearing, and machine a spacer for the bearing to sit on and provide something for the axle to clamp against. As most backplates don't have enough "meat" to allow this, I think it is easier to use a disc set up. . It would be impossible to give a set of dimensions for this, but the following drawing lays out the general principal.  The axle spacer has a large shoulder that goes against the wheel, the caliper plate is fabricated from 1/4" steel plate and welded to the bearing housing. The sealed ball bearing sits in the bearing housing, and is retained by the circlip. This assembly then pushes onto the axle spacer, followed by the outer retainer, which serves to provide side to side location for the inner race of the bearing. As in the next drawing. 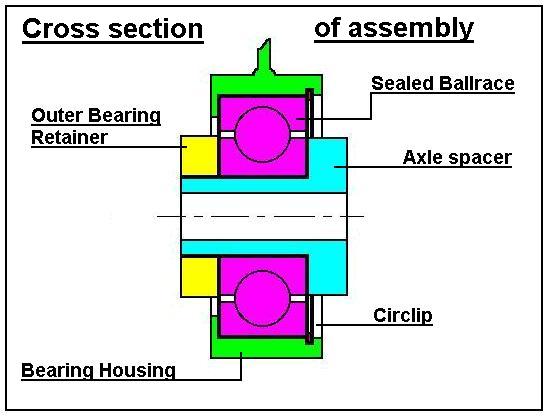 When welding the caliper plate to the bearing housing it is best to jig it so that the plate remains perpendicular to the housing. This is quite easily done by drilling a piece of 1/4" or thicker plate and using spacers to hold everything in alignment. 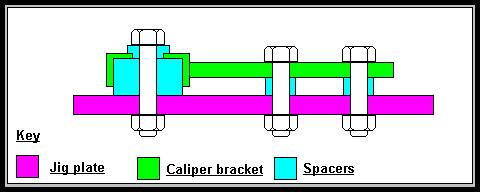 Don't take it off the jig unit it has fully cooled. If the spacers are thought out carefully it should then be possible to turn the unit over and bolt it down again to weld the other side, again letting it fully cool before removing from the jig. . Two "Rose" or Heim joints screwed into to a drilled and tapped bar serves as the torque arm.  The final drawing shows a sketch of the finished installation. Notice that welding a bracket to the rear leg is not a good idea, It is possible to drill and tap the leg to accept a bolt to fix the rear end of the torque arm, but there are two reasons not to do this, at least straight away. . Firstly the length and height of the torque arm may require a little playing around to get the best result, the layout of the last drawing is the theoretical ideal, but rider preference and fork geometry may require a different set up. A clamp on bracket allows for easy adjustment of the geometry of the set up. Lowering the rear of the arm causes the fork to rise under braking, raising it has the opposite effect. Extremes of either are problematic, but a little of what you prefer won't hurt. If there is an existing bracket then work the mounting plate out so you can use it, and perhaps provide three holes in the caliper plate to allow for parallel, uphill, and downhill torque arm positions. . The second reason? Well don't come crying to me if you snap the tap off in the leg! Some springers use Chrome moly for the legs, which is why you dont want to weld it, and it isn't that easy to tap. |
![]()