Bench Synchronizing
Carbs
Contrary to popoular belief
Bench synchronizing carbs is no more complicated than gapping plugs or
setting points. Same principle. All you'll need is a very small drill bit
or small diameter (1/16" works well) rod that is stiff and striaght (large
paper clip straightened out works too, just make sure it can be inserted
perfectly straight into the throat of the carb, a 17mm open end wrench,
10mm box end, and some patience.
 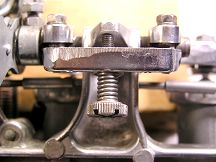 Fisrt step is to situate the
carbs so you can easily reach the adjusters and lock nuts shown above left
yet still be able to slide your "gauge" under the slider without having
to angle it. Turn the adjusters and lock nuts down until you have about
2 threads showing on the rod (again, above left). Next pick a carb
to start with adjust the idle stop screw (above right) so that the gauge
just slides under the slider as shown below. I use #2 because it is directly
in between the idle stop screw and spring and usually returns to the exact
same spot during the process.
Fisrt step is to situate the
carbs so you can easily reach the adjusters and lock nuts shown above left
yet still be able to slide your "gauge" under the slider without having
to angle it. Turn the adjusters and lock nuts down until you have about
2 threads showing on the rod (again, above left). Next pick a carb
to start with adjust the idle stop screw (above right) so that the gauge
just slides under the slider as shown below. I use #2 because it is directly
in between the idle stop screw and spring and usually returns to the exact
same spot during the process.
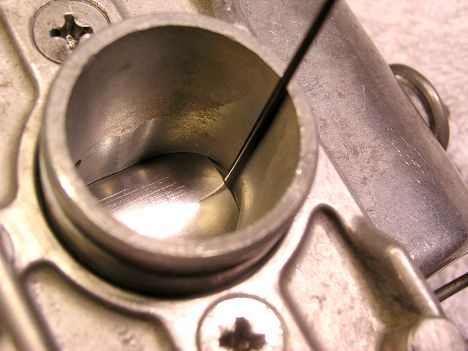
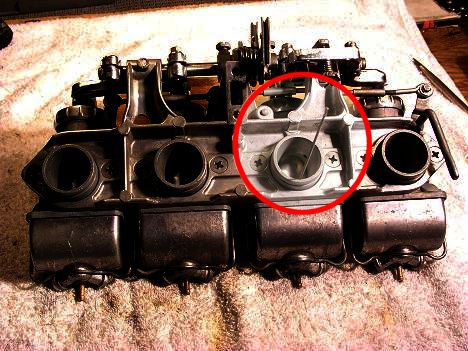 There is a very small notch
at the bottom edge of the sliders on the engine side, and this is why I
use the shank of a very small drill bit (image below). That notch is seldom
marred up, but as most will find out many racks have been in the hands
of Billy Joe Bob Bighammer and they've used a screwdriver or other implement
of destruction to free stuck slides in the past and marred the bottom edge
of the slider. Once you have that set so that the bit is just lightly snug
between the bottom of the carb throat and the notch at the bottom of the
slider you can move on to the rest of the carbs. Looking at it from the
top turning the larger adjuster nut clockwise raises the slider, and counter
clockwise lowers it. It helps to keep the lock nuts snug as you adjust
but don't tighten them down yet.
There is a very small notch
at the bottom edge of the sliders on the engine side, and this is why I
use the shank of a very small drill bit (image below). That notch is seldom
marred up, but as most will find out many racks have been in the hands
of Billy Joe Bob Bighammer and they've used a screwdriver or other implement
of destruction to free stuck slides in the past and marred the bottom edge
of the slider. Once you have that set so that the bit is just lightly snug
between the bottom of the carb throat and the notch at the bottom of the
slider you can move on to the rest of the carbs. Looking at it from the
top turning the larger adjuster nut clockwise raises the slider, and counter
clockwise lowers it. It helps to keep the lock nuts snug as you adjust
but don't tighten them down yet.
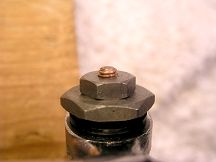
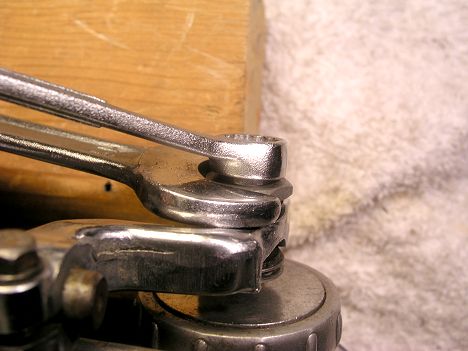
 After adjusting each carb and
before moving on to the next raise and lower the sliders, as if you were
throttling the bike and check again. Sometimes it may take several adjustments
to get it just right. Once all the sliders are adjusted you can lock the
nuts down (image below). Then check again. Often one will get nudged out
of adjustment when you tighten the nuts so just loosen that one and readjust
a bit. Make sure you hold the 17mm open end wrench in place firmly so the
adjuster nut does not turn when you tighten the lock nut down. It is not
necessary to mash the lock nuts down. Nice and snug is good enough. Too
tight and it can bend or strip the threads and make future adjustments
a pain in the rear or ruin the slider rod.
After adjusting each carb and
before moving on to the next raise and lower the sliders, as if you were
throttling the bike and check again. Sometimes it may take several adjustments
to get it just right. Once all the sliders are adjusted you can lock the
nuts down (image below). Then check again. Often one will get nudged out
of adjustment when you tighten the nuts so just loosen that one and readjust
a bit. Make sure you hold the 17mm open end wrench in place firmly so the
adjuster nut does not turn when you tighten the lock nut down. It is not
necessary to mash the lock nuts down. Nice and snug is good enough. Too
tight and it can bend or strip the threads and make future adjustments
a pain in the rear or ruin the slider rod.
 That pretty much has it. Not
difficult at all, just a bit tedious and requires a little patience.
That pretty much has it. Not
difficult at all, just a bit tedious and requires a little patience.
Houndog750 |
|