Nearly all aftermarket carb
kits come with newer idle screws that have a pre-bored metering hole in
the end. I'm nto sure if this is an EPA thing or not, but running free
flowing air cleaners of any kind on the 71-76 style CB750 carbs often presents
a bit of a problem wiht these pre metered idle screws. The stock air cleaners
introduce some vacuum to the intake side of the carbs that aftermarket
air filters (or Vstacks) eliminates. The problem is the idle screws cannot
be adjusted in far enough to compensate for the additional air flow and
reduced draw on the idle circuit. Add drags or open headers and the problem
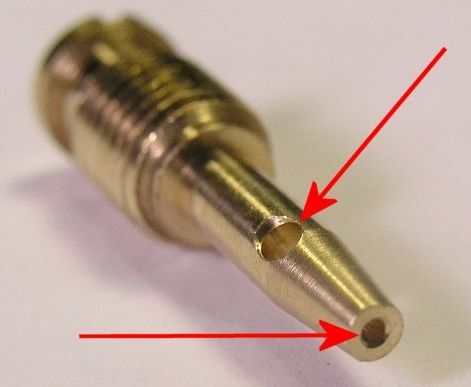
is often more noticeable. Below is a pic of an idle screw out of a new
rebuild kit showing the pre metered bored in the center which allows air
to pass into the circuit even with the screw turned in all the way in to
where it seats.
 Boring out the pilot jets is
not a solution as this alters the transition point from idle to low RPMs
and actually creates a "fat spot" or spot in the throttle throw that runs
too rich. This fat spot often makes the bike cough or stutter under light
load (like pulling away from a stop while a cop is watching). Since the
idle screws on the 71-76 style carbs controls the amount of air into the
low end circuit (not just idle) the solution is to eliminate the pre metered
bore so the screw can be turned in far enough to balance the fuel to air
mixture.
Boring out the pilot jets is
not a solution as this alters the transition point from idle to low RPMs
and actually creates a "fat spot" or spot in the throttle throw that runs
too rich. This fat spot often makes the bike cough or stutter under light
load (like pulling away from a stop while a cop is watching). Since the
idle screws on the 71-76 style carbs controls the amount of air into the
low end circuit (not just idle) the solution is to eliminate the pre metered
bore so the screw can be turned in far enough to balance the fuel to air
mixture.
 JB Weld is impervious to gas,
withstands heat quite well, and holds up to vibration extremely well so
it is ideal for plugging the holes in the idle screw. The idle screw must
be sqeaky clean! Dip it in MEK or another solvent that works to dissolve
oils that may have been left behind during the manufacturing and packaging
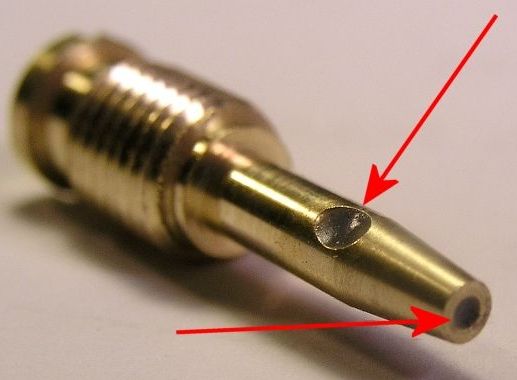
process. Mix a small amount of JB Weld and push the tip of the screw down
into the JB Weld repeatedly until it begins to squeeze out of the holes
on the sides (see image above). Be VERY CAREFUL not to get any on the threads!
If you do you will have to immediately clean the idle screw thoroughly
in denatured or rubbing alcohol before the JB Weld sets. Dilligently wipe
any excess JB Weld from the shaft and end of the idle screw with a clean
papaer towel until it is a bit concave in the holes as shown above. Be
absolutely sure you have the shaft clean of any JB Weld, in particular
the taper as this seats in the carb casting. To speed up the curing process
you can bake the screws in your oven at 200 degrees for about 45 minuts
and they will be ready to go. Then tune the idle as you would normally.
JB Weld is impervious to gas,
withstands heat quite well, and holds up to vibration extremely well so
it is ideal for plugging the holes in the idle screw. The idle screw must
be sqeaky clean! Dip it in MEK or another solvent that works to dissolve
oils that may have been left behind during the manufacturing and packaging
process. Mix a small amount of JB Weld and push the tip of the screw down
into the JB Weld repeatedly until it begins to squeeze out of the holes
on the sides (see image above). Be VERY CAREFUL not to get any on the threads!
If you do you will have to immediately clean the idle screw thoroughly
in denatured or rubbing alcohol before the JB Weld sets. Dilligently wipe
any excess JB Weld from the shaft and end of the idle screw with a clean
papaer towel until it is a bit concave in the holes as shown above. Be
absolutely sure you have the shaft clean of any JB Weld, in particular
the taper as this seats in the carb casting. To speed up the curing process
you can bake the screws in your oven at 200 degrees for about 45 minuts
and they will be ready to go. Then tune the idle as you would normally.
Tip: It would not hurt to
carry a screwdriver with you and ride around roads where you would be stopping
and cruising slowly, and as much as possible in 5th gear so you are spending
as much riding time using the low end circuit. Pay attention to how the
bike sounds as you slowly pull away from a stop. If it stutters a little
or balks a bit back the screw out 1/8 turn and test again. If it pulls
away fine but has a stubborn idle turn the screw in 1/8 turn and test again.
You may have to just nudge the screw to find that sweet spot but in no
time the bike will lope at idle yet pull away from a stop smoothly. A vacuum
sync before hand is strongly recommended.
Houndog750 |