 |
...Back...|...Prorject Chopper...|...The Gallery...|...Hondachopper Home... . ...Page 1...|...Page 2...|...Page 3...|...Page 4...|...Page 5...|... |
|
...Back...|...Prorject Chopper...|...The Gallery...|...Hondachopper Home... . ...Page 1...|...Page 2...|...Page 3...|...Page 4...|...Page 5...|... |
|
|
Jim's
Chopper Diary
December 2000 - Page 1 Well...my
feet are frozen solid now. It's 5 degrees out, and I've been in the
garage since 10 am. Haven't bought the bloody heater yet...ouch. I
started
this project because I already had the frame and about 3 1/2 engines
sittin' around. I figured from this, I could get one running engine. Plus
I had a bunch of parts stockpiled. Since all the parts would never amount
to a fully restored Honda CB750--- the frame and engine were
different years, and besides, I already have two other stocker CB750's...a
K4 and a '78 Hondamatic-- I figured it would be perfect for a CHOPPER!
|
 |
I
wanted to do a project from the ground up -- engine and all -- without
having to worry about the nitpicky details of doing a correct restoration.
So, with a chopper, I could do pretty much whatever I wanted to,
and who's to say it's "wrong"? If it looks good it is good!
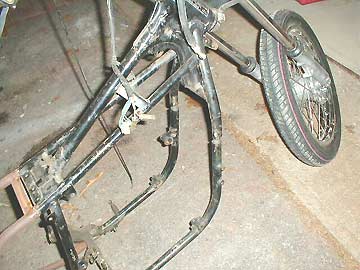
The CB750 SOHC4 engine has plenty of power, and to me looks and runs better than most any V-twin of its era.The CB-750 Mutilation Society page was a great inspiration in actually getting started and going for it. I started with the frame and wheels -- figured I better get a rolling chassis to bolt and weld everything else onto first. I found the hardtail through one of the members of the Ricechoppers list (thanks, Stasher!) and got out my hacksaw. |
||||||||
|
|||||||||
|
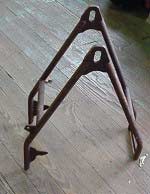
I
cut two 3" sections of the "fat" tube from the old frame rear section that
I cut off earlier, and used the "skinny" tubing to make four plugs. We
inserted the plugs (perfect fit with a little filing and sanding) and drilled
1/8 inch holes through both tubes and spot welded them so the plugs wouldn't
move on us.I cut the frame with a pipe cutter (destroying my weeney pipe
cutter in the process) about 1" below the reinforced section at the top
of the down tubes on both sides.
With the frame opened up, I installed the 3" pieces -- OH NO -- the angle was all wrong and they wouldn't go in! Jeff solved this by cutting halfway through the down tubes just above the upper motor mounts and then beating everything in line with a mallet...very effective. We then used some wooden cribbing and a bottle jack to stretch the frame apart. The key here is to get the frame to bend at the point where the seat area and the top tubes meet up. You don't want to change the relationship of the engine mounts to each other, which is the reason we made sure to do this with the engine installed and bolted in tight. |
|
 |
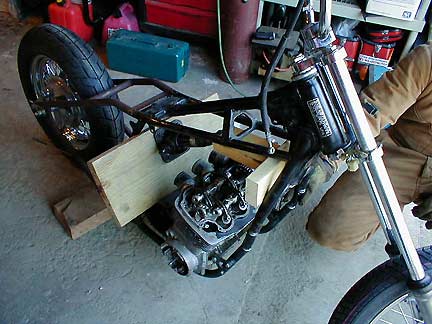
With
the frame tacked in place, I fitted tapered head bearings (ordered through
my local shop) and the chrome triple trees I got from Don Laubach on the
SOHC4 list. Don was kind enough to trade me the triple trees and a set
of racing style carbs for a set of stocker carbs I rebuilt for him.
We then stripped the frame again so that he could take it to Jeff's heated basement and finish welding all the joins. Apparently, it works better if the metal you are trying to weld is warmer than 7 degrees F. Why am I doing this in December? So I can ride to Laconia in the Spring, of course! The
front is stock Honda, with another Buchanan's s/s spoke kit. I like the
Buchanan spokes because they are s/s not plated, and they are thicker and
stronger than the stock item. I did have to ease the holes a wee bit in
the stock Honda 750 front rim to get the nipples to fit.
The tires are Chen Sing Hi-Max -- very cool looking and the price was right for a bike that is not ever likely to be my daily driver, or see foul weather service. |
|
The
forks came from another MC List member friend in Wisconsin, Robb
Zimdarr, who was parting out a never-to-be finished project bike he
found somewhere. The forks tubes are about 5" over, but otherwise they
are stock Honda. The rear wheel is one I made from the hub I already had
and a 16" HD rim and a spoke kit from Buchanan's in CA.
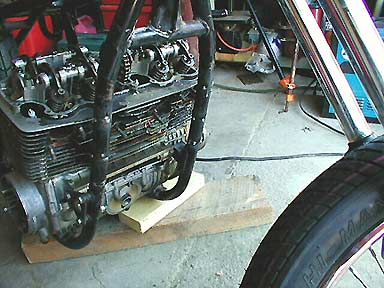
With the frame gone and nothing else to do, I started dismantling the engine. Surprisingly, I got the whole thing torn down in under three hours. I tore the F engine down -- the cylinders weren't worth shooting. Broken fins, broken piston rings, lots of oil sealing goop everywhere. But the cases are great and the internals on the lower end look new. I can graft a K head and cylinders from my other engine to the good lower unit of the F engine and make a Franken-engine that will work. The cases went into the parts washer I got for my birthday (wanna know cold? put your hands in a tank of mineral spirits in an unheated shed at midnight in December in NH...), but still need a lot more cleaning before they are ready for paint. This is my first teardown on a 750 -- my K4 ran so well when I first got it that I never got around to tinkering with it much. I have completely rebuilt a CB550 engine, and for the most part they are pretty similar. Meanwhile, I am thinking of what the color scheme will be, and what color to paint the cases and cylinder. I might decide to reassemble the engine and then paint it once it's all put back together...which would allow me to wait until it gets a bit warmer! |
![]()